Hello and Good Morning all,
Happy August 1st to you. Can you believe that August is here and Back-to-School is around the corner...literally? Man...the summer is going by so fast. I can't keep up.
As you can see from the title of this post, I have moved....my blog that is...LOL!! I have switched from Blogger to WordPress now. I am in the process if trying to figure out how to "Redirect" you when you come to this blog to my new one. I am not the most tech savvy person, but I am determined to figure it out, so bare with me.
Here is my new blog address: www.k2designsnyc.wordpress.com
Head on over there and put it in your favorites. Also, I would love to know that you are follwoing my bog, so please, sign up for the EMAIL SUBSCRIPTION. I really appreciate your loyalty!
Okay...so, in case you come back to this blog and if the REDIRECTIN goes well....it will gently usher you to my new site...fingers crossed...LOL!
Thanks for stopping by and I'll see you on the Flip Side!
Kimberley :)
Monday, August 1, 2011
Tuesday, June 21, 2011
GETTING a FACELIFT - PAIN FREE!!!
Good Morning everyone...and Happy Monday!
I hope that you all had a great weekend and if you celebrate Father's Day...I hope you encouraged the man/men in your life with love, laughter, and loads of fun!
Now, I know that you are probably wondering what the title of my post means. Well, my blog will be moving. I am going to be using WordPress as oppose to blogger and since I am not as tech savvy as I would like to think...I am running into a few "lemons"....but you know Kimba....I'm gonna make some tasty lemonade!...LOL!! I want my blog to represent me and my personality as well as a new venture that I plan on embarking in....don't worry, you will know soon enough. So, please be patient with me. So, for this week, I won't be posting any cards and one the new blog is up and running, I will have a link that will re-direct you from this blog to my new one.
Thanks again for your patience and I hope you will continue you checking in and following my blog. You won't be disappointed! Thanks for stopping by!
Kimba :)
Sunday, June 19, 2011
HAPPY FATHER's DAY Honey!
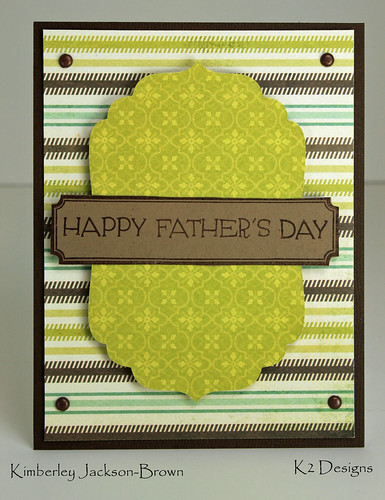
HAPPY FATHER's DAY!!!
This is just a quick post that I wanted to share with you all today. This is that card that I gave my hubby this morning. He loved it!!! My kids made him cards this year and I plan on posting those as well. Thanks for stopping by and continue to enjoy your Father's Day!!
Kimba :)
Tuesday, June 14, 2011
SCRAPLING - here's another one...
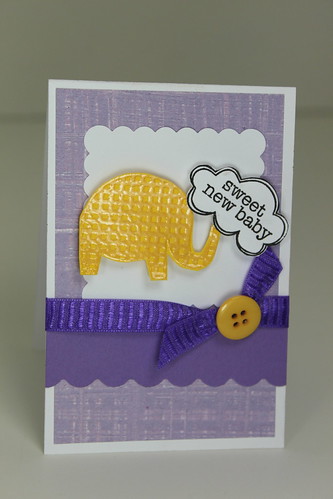
Hey everybody....
If you tuned into yesterday on my blog you would know that I had mentioned about learning about Scraplings. Well, here is another Scrapling that I created. One of my friends is due to have a baby anyday now and I am going to give this one to her when I give her a "Welcome Home" gift - a basket of her favorite goodies. Sorry for the quick post, but this week my son has his Math Regents Exam and I am helping him study for it. As always, thanks for stopping by!
Kimba :)
Monday, June 13, 2011
SCRAPLINGS - Do you know what they are?
Hi there ya'll.....Happy Monday!
Today's card is something that "was" new to me but not anymore. I am part of a Flickr Group and the members have a game that we play every so often. There is a hostess and she runs the game and it's called The 90-minute Scramble. What that means is that you have to create a card in 90 minutes, using at least one HeroArts stamp...and sometimes there's a twist, like the card needs to have buttons, or it needs to have the color red. So, this past Saturday's Scramble was to create a SCRAPLING....and this is what I learned....and I am sure you are wondering what a Scrapling is - a Scrapling is a card that is created with the left over piece of cardstock when you cut a 5.5 x 4.25 piece...you are left with a 1.25 x 4.25 piece and this is what I used to create the card above. This was a challenge for me because it was hard to hold back on the embellishments, and so I decided to keep the stamped image as the "REAL" embellishment and focal point. You should give this a try. What a great way to use up your leftover CS. Shout out to Stampin' Sue for being such a great hostess and for this AWESOME idea called Scraplings!
I hope you learned something new today. Isn't that what it's all about? Learning something new and using it in a creative way....give it a try...I know that once you start creating Scraplings, you won't be able to stop....
Thanks for stopping by!
Kimba :)
Monday, June 6, 2011
You're Special - WATERCOLOR
Hey there all-
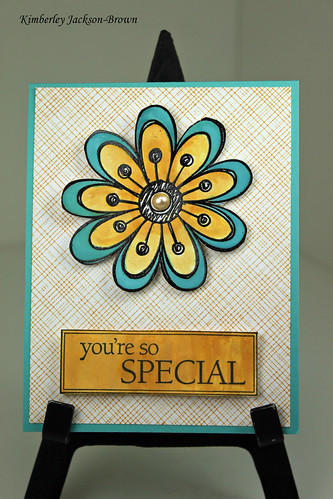
Happy Monday to you. I hope that you had a great weekend. This weekend my kids were away til Sunday, so hubby and I had the house to ourselves. The only bad thing about that was trying to figure what to do and trying to cram EVERYTHING into 3 days...LOL!!! One of the things I did get to do is play with my Distress Inks and create this card using a watercolor technique. I stamped Broken China and Wild Honey on my acrylic block and spritzed it with water, and with a brush, just painted the flower. Here is a link with a video that shows you how to do this technique. It's being done by HeroArts Artist Shari Carroll. It's really easy, so please give it a try. Just another way to add color to your cards and projects.
Thanks for stopping by. I love it when you do. Until tomorrow....
Kimba :)
Tuesday, May 31, 2011
HeroArts DIGITAL Printables and Stamping

I hope that you had a great Memorial Day Weekend and that you got some time to spend with family and friends. Did any of you get to do any card making or scrapbooking? Crafting of ay sort? I sure hope so...
For today's card I combined a digital element with a stamp image. Can you guess what the digital element is? NOPE...not the HeroArts Hydrandgea. YEP, it's the OLD LETTER WRITING in the shape of a label. HeroArts has Digital Printables that are AWESOME! Their images are so true and amazing, that all it needs is some ink, or Copic Markers, or Colored Pencils, or...I could go on and on. If you get a chance, check them out. I am so sure you would love them as much as I do. And the really interesting this is that this is the VERY FIRST time that I have ever used any kind of Digital anything. It was so easy. Open the PDF, print it out on cardstock, and color and cut. Sooo much fun to use and I am now a TRUE Digi-Lover!!!
I colored the flower using my PrismaColored Pencils. I inked up the label using Vintage Photo Distress Ink. I am really proud of the finished product and it just goes to show that trying new things ain't so bad and more times than not, you'll surprise yourself and love the outcome! Here's to TRYING NEW THINGS...LOL!
Anywho, gotta run. Thanks so much for stopping by and please, leave me some love. I really enjoy hearing from you! Have a great day!
Kimba :)
Subscribe to:
Posts (Atom)